

はじめに
このページでは、Cordaの公式チュートリアルを参考にCorDappを作成する手順を解説していきます。今回はKotlinのCorDappテンプレートを利用してIOUコントラクト(借用書コントラクト)を実装してみます。
Prerequisite
以下のVersionは厳密に対応しないと動きません。
- Java 8 JDK: Version8u171以上。ただしVersion9以上はサポートされていません。
- Intellij IDEA: Version 2017.x, 2018.x, 2019.x
- Git
- Gradle: 5.4.1 * Intellij IDEAを利用する場合、自動的に対応するGradleが読み込まれます。
Install
Intellij IDEA のインストール

Java
今回はMacOS, jdk-8u261を利用しました。

Getting started
開発用で公式からCorDappのテンプレートが提供されています。テンプレートにはKotlinとJavaのものがあります。
Cordaのコードは主にKotlinが利用されているので、Kotlinを利用して開発を始めてみます。
まずはプロジェクトのテンプレート(corda-template-kotlin)をクローンしましょう
git clone https://github.com/corda/cordapp-template-kotlin.git
IntelliJ IDEAでCorDappのサンプルを開く
IntelliJでcordapp-template-kotlinを開き以下の手順で,IDEの環境設定をします。
IDEのJava環境設定
- File > Project Structure > Porject Settings > Project > SDKを選択(version 8u171以上) > OK

依存ライブラリのインストール
次にbuild.gradleファイル上で右クリックしimport Gradle Projectを選択します。 これで依存ライブラリーなどがインストールされます。
- IDEがライブラリを読み込んでからコード補完が反映されるまで5分程度かかる場合があります。設定が読み込まれるまでエディターによるエラーが表示されますが、数分待って反映を待ちましょう。
プロジェクトの構造
StateのファイルとFlowのファイルが以下のディレクトリにあります。
このチュートリアルではこの二つのファイルを編集します。
// 1. The state
contracts/src/main/kotlin/com/template/states/TemplateState.kt

// 2. The flow
workflows/src/main/kotlin/com/template/flows/Flows.kt
Stateの記述
Cordaでstateは共有された事実を表します。
まずはじめに、IOUを表すStateタイプを定義します。
ContractState Interface
Cordaのstateは、ContractState Interfaceを実装したインスタンスです。ContractState Interfaceを実装したStateはCordaによって自動的に台帳に記録されます。
ContractState Interfaceは以下のように、事実(State)が共有される当事者のリストを持ちます。
interface ContractState {
     // The list of entities considered to have a stake in this state.
    val participants: List<AbstractParty>
}
IOUのモデリング
IOUを表現するStateを定義してみましょう。IOUは以下の要素があります。
- 金額(value)
- 貸主(lender)
- 借主(borrower)
以下のようなコードになります。
import net.corda.core.contracts.ContractState
import net.corda.core.identity.Party

class IOUState(
        val value: Int,
        val lender: Party,
        val borrower: Party,
) : ContractState {
    override val participants: List<AbstractParty>
        get() = listOf(lender, borrower)
}
これでstateの作成が完成しました。
CorDappにおけるStateとは、ContractState Interfaceを実装した単なるクラスです。
StateはContractStateの他に任意のプロパティーやメソッドを定義することができます。
次にFlowを作成します。
Flowの作成
FlowはStateを更新するためにノードが実行できるワークフローをコード化したものです。
ノードはFlowを実行することでLedgerに新しいステートを書き込むことができます。
*Flowの概要に関してもう少し詳しく知りたい方はこちら
Flowの概要
Flowはトランザクションの発行を管理します。トランザクションはCordaにおいて状態を変更する最小単位の処理です。
トラクザクションは0か1つ以上のStateをインプットとして消費し、新しい0か1つ以上のアウトプット(State)を生成します。
IOUのFLOW
IOUトランザクションをLedgerに書き込むプロセスは貸主によって開始されます。
貸主がIOUを発行するトランザクションを発行するには以下のステップが必要となります。
- 新しいIOUを発行するトランザクションプロポーザルを貸主が作成
- トランザクションプロポーザルにサインする
- トランザクションをレジャーに書き込み、IOUの借主もレジャーに書き込めるように貸主にトランザクションを送信する
FlowLogic
FlowはFlowLogicのサブクラスとして実装します。FlowLogic.callをオーバーライドしてフローのステップをコーディングします。
テンプレートのInitiaterを以下のように書き換えましょう。
// Add these imports:
import net.corda.core.contracts.Command
import net.corda.core.identity.Party
import net.corda.core.transactions.TransactionBuilder

// Replace Initiator's definition with:
@InitiatingFlow
@StartableByRPC
class IOUFlow(val iouValue: Int,
              val otherParty: Party) : FlowLogic<Unit>() {

    /** The progress tracker provides checkpoints indicating the progress of the flow to observers. */
    override val progressTracker = ProgressTracker()

    /** The flow logic is encapsulated within the call() method. */
    @Suspendable
    override fun call() {
        // We retrieve the notary identity from the network map.
        val notary = serviceHub.networkMapCache.notaryIdentities[0]

        // We create the transaction components.
        val outputState = IOUState(iouValue, ourIdentity, otherParty)
        val command = Command(TemplateContract.Commands.Action(), ourIdentity.owningKey)

        // We create a transaction builder and add the components.
        val txBuilder = TransactionBuilder(notary = notary)
                .addOutputState(outputState, TemplateContract.ID)
                .addCommand(command)

        // We sign the transaction.
        val signedTx = serviceHub.signInitialTransaction(txBuilder)

        // Creating a session with the other party.
        val otherPartySession = initiateFlow(otherParty)

        // We finalise the transaction and then send it to the counterparty.
        subFlow(FinalityFlow(signedTx, otherPartySession))
    }
}
少しずつこのコードをみていきましょう
FlowLogic, FlowLogic.call
以下のように、IOUFlowはFlowLogicのサブクラスとして定義されています。
FlowLogic.callをオーバーライドすることでIOUFlowのフローを定義します。
また、FlowLogicは型パラメーターを取りますが、この型はFlowLogic.callの戻り値の型となります。
class IOUFlow(): FlowLogic<Unit>() {
    override fun call() {
        //...callの戻り値の型はUnit
    }
}
IOUFlowのコンストラクタパラメーター
Ledgerに書き込むIOUStateの値をトランザクションに含めるためにIOUFlowはコンストラクタ引数にvalue, borrowerを含みます。
class IOUFlow(val iouValue: Int, val otherParty: Party) : FlowLogic<Unit>() {
    // ...
}
@Suspendable
Flowはトランザクションの相手方が応答することで完了します。
そのため、Flowが長い間待たされる場合はFlowは中断されデータはディスクに書き込まれる事になります。これを表現するのが@Suspendableです。
@Suspendableアノテーションを記述するのを忘れるとエラーが発生してしまいます。
class IOUFlow(): FlowLogic<Unit>() {
    @Suspendable
    override fun call() {
        // ...
    }
}
@InitiatingFlow, @StartableByRPC
@InitiatingFlowはフローの開始側である事を示します。フローは当事者間の契約合意フローを表すものであり、フローの開始側と受け取り側が存在します。
@InitiatingFlowを起動すると、後で定義する受けとり側のノードのフローであるIOUFlowResponderが起動します。
@StartableByRPCはRPCコールによってこのフローを起動可能とします。
@InitiatingFlow
@StartableByRPC
class IOUFlow(): FlowLogic<Unit>() {
    @Suspendable
    override fun call() {
        // ...
    }
}
Transaction Building
トランザクションプロポーザルは以下の手順で作成します。
- トランザクションコンポーネントの作成
- トランザクションビルダーにコンポーネントを追加
- トランザクションへサイン
- トランザクションをファイナライズ
これらの処理はIOUFlow.callに記述されています。
class IOUFlow(): FlowLogic<Unit>() {
    @Suspendable
    override fun call() {
        // We retrieve the notary identity from the network map.
        val notary = serviceHub.networkMapCache.notaryIdentities[0]
        // 1.We create the transaction components.
        val outputState = IOUState(iouValue, ourIdentity, otherParty)
        val command = Command(TemplateContract.Commands.Action(), ourIdentity.owningKey)

        // 2.We create a transaction builder and add the components.
        val txBuilder = TransactionBuilder(notary = notary)
                .addOutputState(outputState, TemplateContract.ID)
                .addCommand(command)

        // 3.We sign the transaction.
        val signedTx = serviceHub.signInitialTransaction(txBuilder)

        // Creating a session with the other party.
        val otherPartySession = initiateFlow(otherParty)

        // 4.We finalise the transaction and then send it to the counterparty.
        subFlow(FinalityFlow(signedTx, otherPartySession))
    }
}
それぞれの処理をみていきましょう。
Notary
トランザクションは二重支払い防止のためにノータリーが必要です。
ServiceHub.networkMapCacheからノータリーを取得します。
class IOUFlow(): FlowLogic<Unit>() {
    @Suspendable
    override fun call() {

    }
}
トランザクションの構成
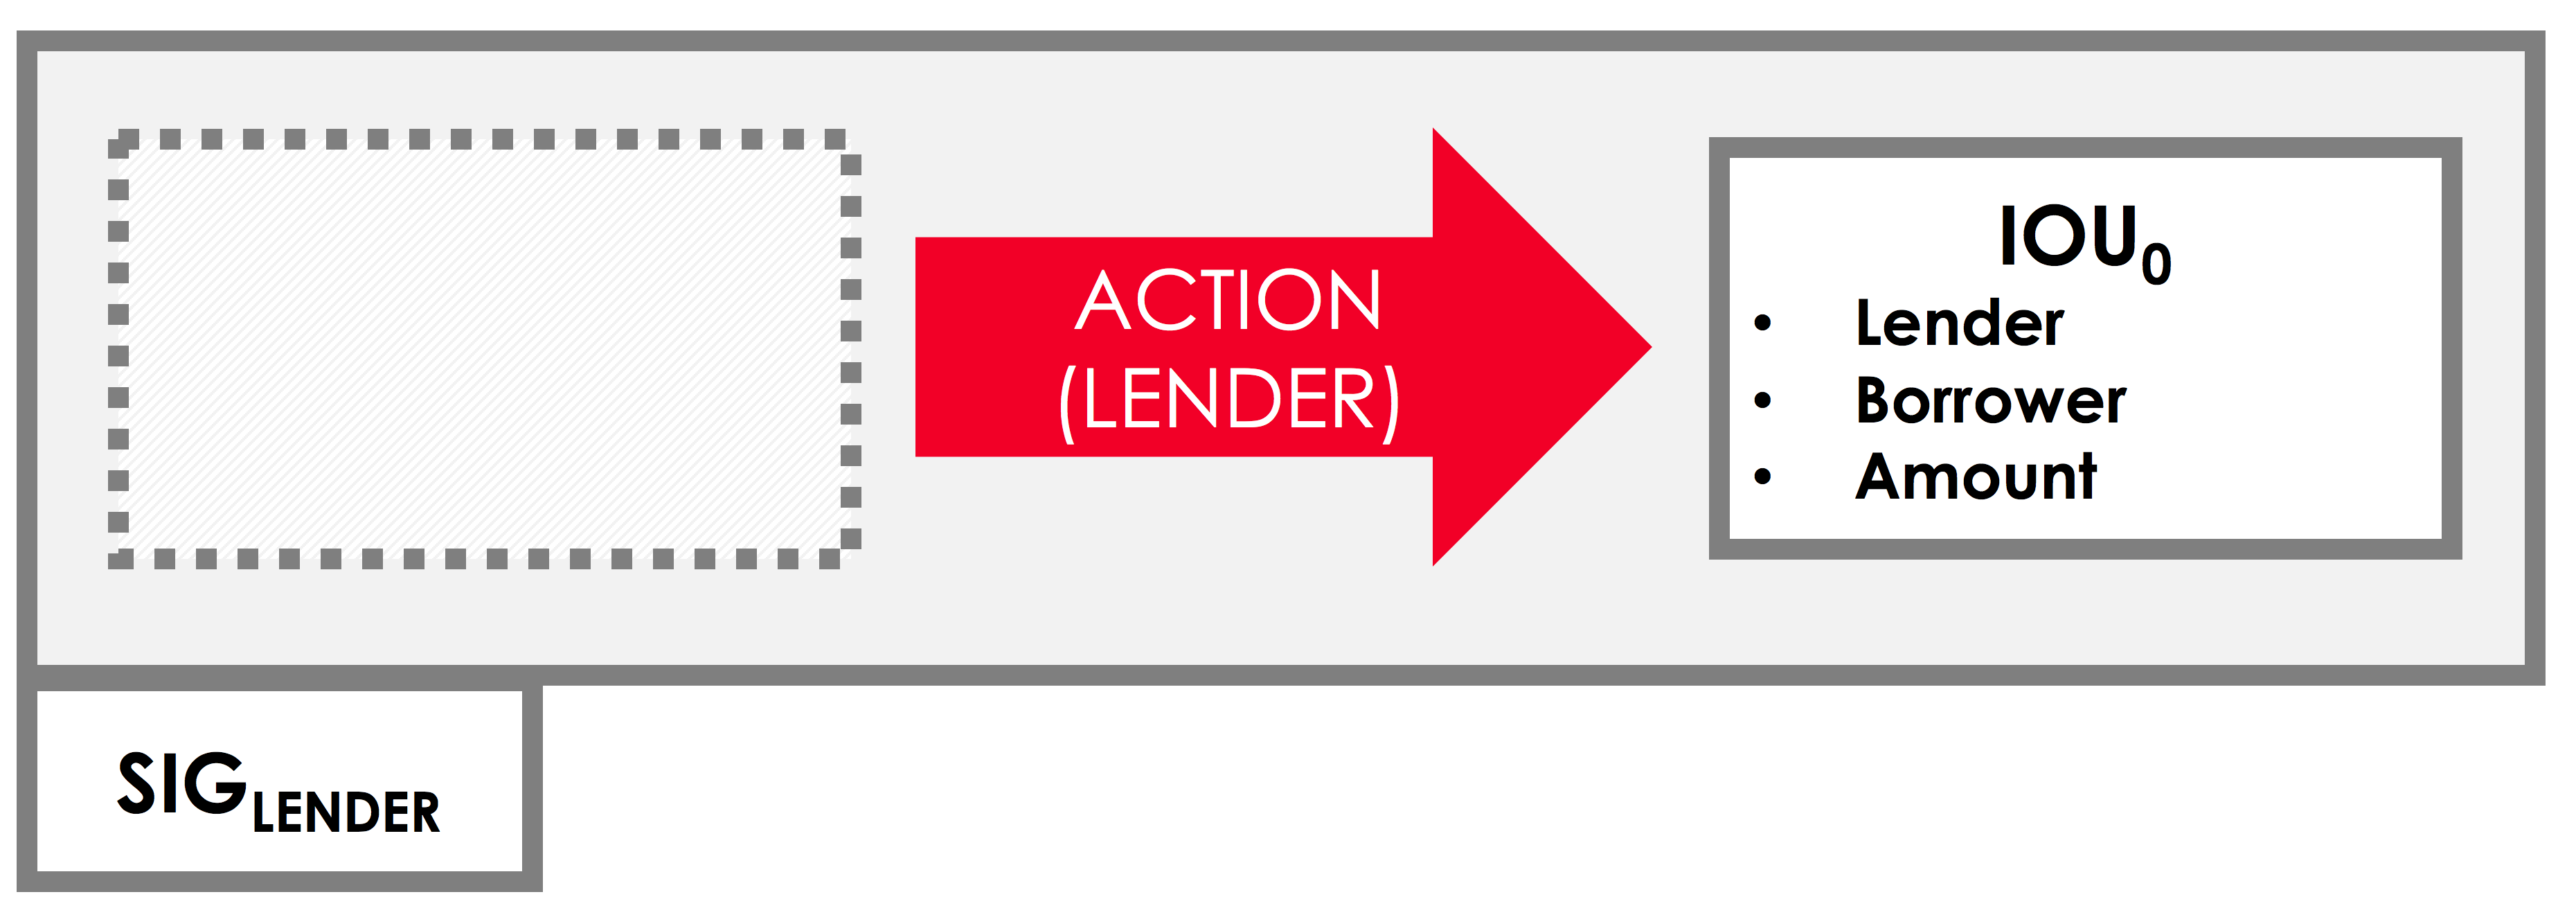
トランザクションはインプットを持たず、Lender, Borrower, AmountのIOUSateがアウトプットとなっています。
ActionはIOUのLenderを署名者としてリストします。
Command
Commandは以下の二つの役割を持ちます。
- Transactionの意図を示す
- Transactionに必要な署名者を表す
Transaction Builder
TransactionBuilderには inputs, outputs, commandsなどトランザクションに必要な情報を追加することができます。
Sign Transaction
トランザクションへ署名します。
Finalize Transaction
有効なトランザクションプロポーザルを作成したらファイナライズします。
最後に必要なのはノータリーの署名を得て、ローカルに記録し、関係する当事者にトランザクションを送信します。
これらの処理が終わるとレジャーに記録されデータが永続化されます。
Borrower’s flow
Lenderからトランザクションを受け取った際、Borrowerはレスポンドするためのフローが必要となります。
// Replace Responder's definition with:
@InitiatedBy(IOUFlow::class)
class IOUFlowResponder(private val otherPartySession: FlowSession) : FlowLogic<Unit>() {
    @Suspendable
    override fun call() {
        subFlow(ReceiveFinalityFlow(otherPartySession))
    }
}
以下、記述をみていきましょう。
@InitiatedBy(IOUFlow:class)
IOUFlowからトランザクションを受け取った時にIOUFlowResponderが実行される事を記述しています。
IOUFlowResponder.call
IOUFlowと同様に, FlowLogic.callをオーバーライドしたIOUFlowResponder.callが呼ばれます。IOUFlowResponder.callによってトランザクションをファイナライズしています。
以上でCordappの記述は完了です。
CorDappを起動する
CorDappの記述を完了したので、次は実際にCorDappを起動してみましょう。
デプロイスクリプト
ここでbuild.gradleファイルに記述されているノードの起動スクリプトをみてみましょう。deployNodesタスクの定義を確認してみてください。
上から順に以下の3つのnodeが定義されています。
- Validating Notaryとネットワークマップサービスの役割を果たすNode
- 2つ目のノードはIOUの発行者PartyAの所有するNode
- 3つ目のノードはIOUの購入者PartyBの所有するNode
task deployNodes(type: net.corda.plugins.Cordform, dependsOn: ['jar']) {
    nodeDefaults {
        projectCordapp {
            deploy = false
        }
        cordapp project(':contracts')
        cordapp project(':workflows')
    }
    node {
        name "O=Notary,L=London,C=GB"
        notary = [validating : false]
        p2pPort 10002
        rpcSettings {
            address("localhost:10003")
            adminAddress("localhost:10043")
        }
    }
    node {
        name "O=PartyA,L=London,C=GB"
        p2pPort 10005
        rpcSettings {
            address("localhost:10006")
            adminAddress("localhost:10046")
        }
        rpcUsers = [[ user: "user1", "password": "test", "permissions": ["ALL"]]]
    }
    node {
        name "O=PartyB,L=New York,C=US"
        p2pPort 10008
        rpcSettings {
            address("localhost:10009")
            adminAddress("localhost:10049")
        }
        rpcUsers = [[ user: "user1", "password": "test", "permissions": ["ALL"]]]
    }

}
デプロイの実行
以下のコマンドで、CorDappがデプロイされた状態のノードがbuild/nodes配下に作成されます。
// On Windows
gradlew clean deployNodes

// On Mac
./gradlew clean deployNodes
作成されたノード

ノードの起動
build/nodes/runnodesを起動することで、作成されたノードがそれぞれ立ち上がります。
Terminalを開き、build/nodes/runnodesを実行することでそれぞれのノードが立ち上がります。
./build/nodes/runnodes
- IDEとは別にTerminalを開いた上で
build/runnodesを実行しないとNodeが立ち上がらないケースがあります。
Flowの実行
./build/runnodesで立ち上がったPartyAのノードのコンソール上でIOUFlowを実行してみます。
start IOUFlow iouValue: 99, otherParty: "O=PartyB,L=New York,C=US"
すると自動的にPartyBがResponderFlowにしたがって契約に合意し、台帳が更新されます。
更新内容の確認
PartyAとPartyBのコンソールでそれぞれ以下のコマンドを実行してみましょう。
どちらでも同じ内容で台帳が更新されていることが確認できます。
run vaultQuery contractStateType: com.template.states.IOUState
states:
- state:
    data:
      value: 99
      lender: "C=GB,L=London,O=PartyA"
      borrower: "C=US,L=New York,O=PartyB"
      participants:
      - "C=GB,L=London,O=PartyA"
      - "C=US,L=New York,O=PartyB"
    contract: "com.template.contract.IOUContract"
    notary: "C=GB,L=London,O=Notary"
    encumbrance: null
    constraint:
      attachmentId: "F578320232CAB87BB1E919F3E5DB9D81B7346F9D7EA6D9155DC0F7BA8E472552"
  ref:
    txhash: "5CED068E790A347B0DD1C6BB5B2B463406807F95E080037208627565E6A2103B"
    index: 0
statesMetadata:
- ref:
    txhash: "5CED068E790A347B0DD1C6BB5B2B463406807F95E080037208627565E6A2103B"
    index: 0
  contractStateClassName: "com.template.state.IOUState"
  recordedTime: 1506415268.875000000
  consumedTime: null
  status: "UNCONSUMED"
  notary: "C=GB,L=London,O=Notary"
  lockId: null
  lockUpdateTime: 1506415269.548000000
totalStatesAvailable: -1
stateTypes: "UNCONSUMED"
otherResults: []
残りのステップ
ここではまだ解説していないのが、契約に制約をかけるContractです。
公式サイトに記述があるのでリンクを載せておきます。